Introduction & Inspiration
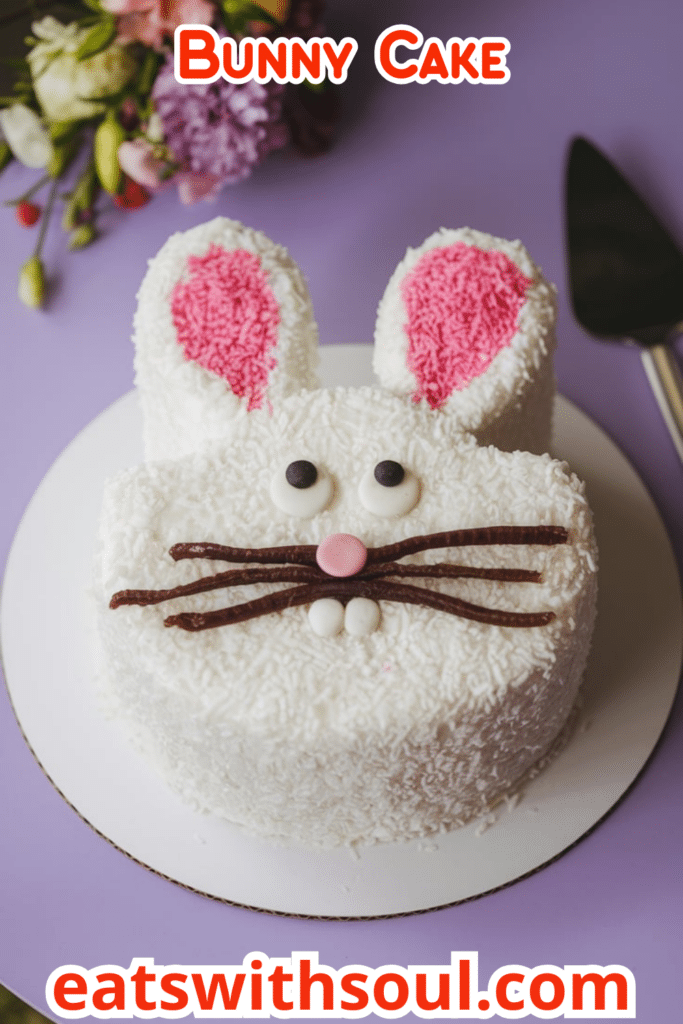
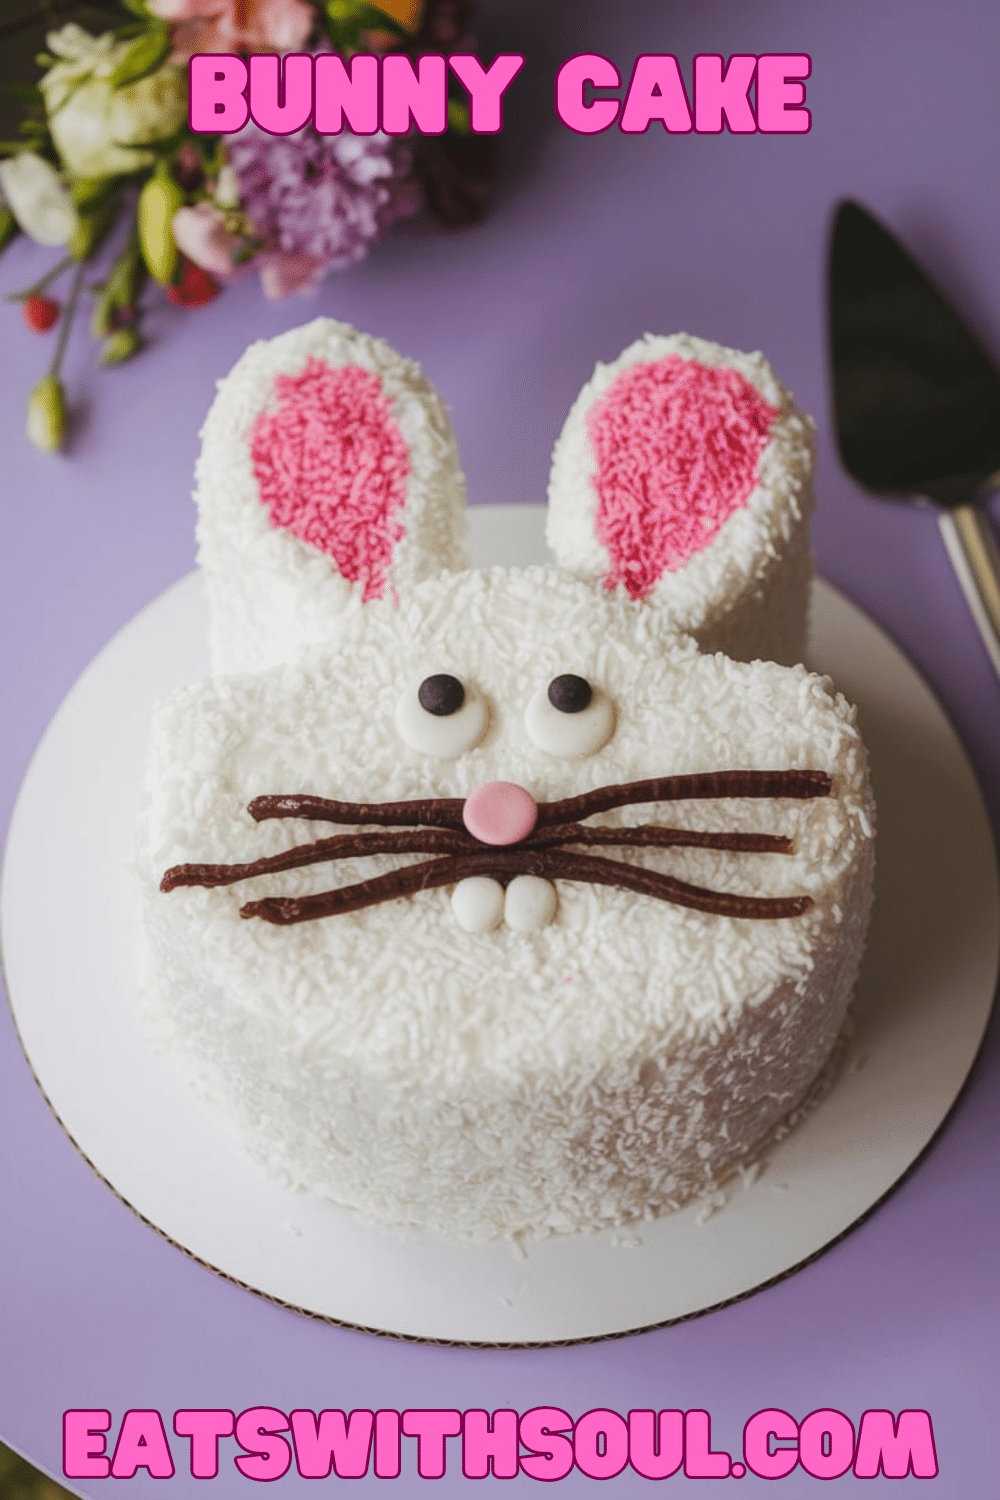
This Bunny Cake is an adorable and festive dessert, perfect for Easter, spring celebrations, or any occasion that calls for a whimsical and delicious cake. It’s a surprisingly easy cake to make, using two round cakes – one for the head and one cleverly cut to create the ears – and decorated with simple frosting, coconut “fur,” nonpareil “inner ears,” and licorice features.
My inspiration came from wanting to create an Easter-themed cake that was both visually appealing and achievable for home bakers of all skill levels. I love the idea of a cute bunny cake, but I didn’t want a recipe that required complicated carving or fondant work. This design is simple yet effective, and it’s sure to bring a smile to everyone’s face.
I also wanted a cake that tasted as good as it looked. The combination of chocolate cake, creamy vanilla frosting, and a touch of coconut creates a delicious and satisfying dessert. It is a perfect cake for Easter.
And kids will love it.
Nostalgic Appeal
Easter, for many, evokes feelings of springtime, family gatherings, egg hunts, and sweet treats. Bunny-shaped desserts are a classic part of Easter celebrations, and they often bring back fond childhood memories.
Cake, in general, is a celebratory food, often associated with birthdays, holidays, and special occasions.
This Bunny Cake taps into that sense of nostalgia and celebration, offering a way to create a fun and festive dessert that’s perfect for sharing with loved ones. It’s a cake that’s sure to be a hit with both kids and adults.
It’s perfect to bring at a party.
Homemade Focus
While this recipe utilizes a boxed cake mix for convenience, the frosting is made from scratch, and the assembly and decoration of the bunny cake are all about the homemade touch. We’re taking a shortcut with the cake base, but we’re elevating the entire dessert with a creamy, flavorful frosting and a charming design.
I believe in finding that balance between convenience and homemade goodness. Sometimes, a pre-made element allows you to focus your energy on the more creative and decorative aspects of a recipe.
The homemade frosting is key to achieving that perfect creamy texture and flavor. It’s a simple combination of butter, powdered sugar, milk, and vanilla extract, but it makes all the difference.
And the assembly and decoration of the cake – cutting the ears, frosting the cake, adding the coconut “fur,” and creating the facial features – is where the real fun begins. It’s a chance to get creative and make the cake your own.
It’s also, a perfect activity to do with kids.
Flavor Goal
The primary flavor goal for this Bunny Cake is a classic combination of chocolate cake and creamy vanilla frosting, with a hint of coconut from the “fur.”
The chocolate cake mix provides a rich, chocolatey base. The addition of mini chocolate chips adds an extra burst of chocolate flavor.
The homemade vanilla frosting is creamy, smooth, and not overly sweet, providing the perfect complement to the chocolate cake.
The unsweetened desiccated coconut adds a subtle coconut flavor and a texture that mimics the look of bunny fur.
The nonpareils add a pop of color and a bit of sweetness to the bunny’s nose and inner ears.
The black licorice adds a contrasting flavor and creates the bunny’s eyes and mouth.
Ingredient Insights
Let’s take a closer look at the key ingredients:
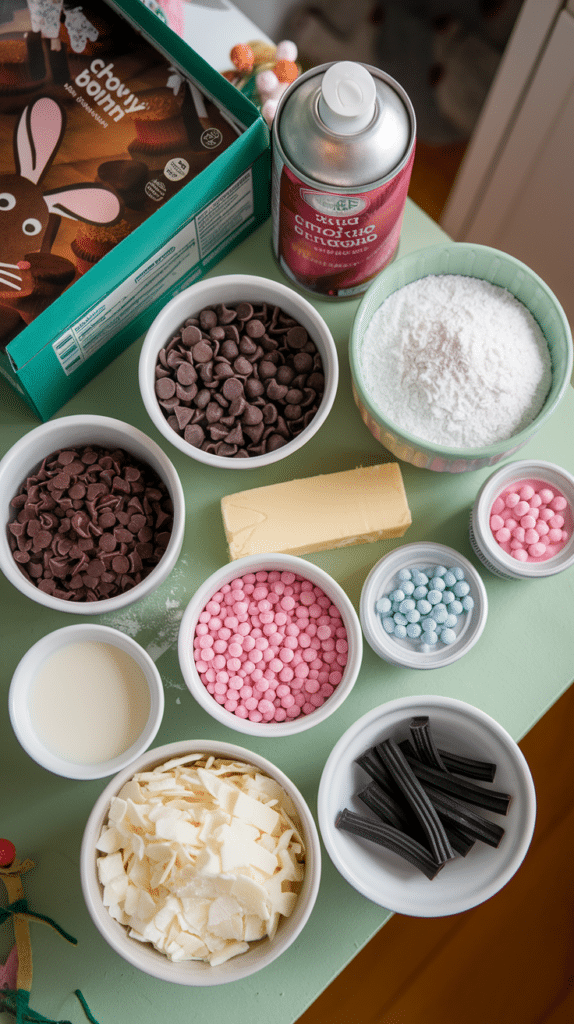
- Chocolate cake mix (plus required ingredients): Provides the base for the cake. You can use any brand of chocolate cake mix you prefer.
- Mini chocolate chips: Add an extra burst of chocolate flavor to the cake.
- Salted butter, at room temperature: The foundation of the frosting. Using salted butter adds a subtle salty note that balances the sweetness of the powdered sugar. Make sure the butter is at room temperature for easy beating.
- Powdered sugar: Provides sweetness and structure to the frosting.
- Whole milk: Adds moisture and helps to create a smooth and creamy frosting.
- Vanilla extract: Enhances the flavor of the frosting.
- Pink and white nonpareils: Used to decorate the bunny’s nose and inner ears.
- Unsweetened desiccated coconut: Creates the “fur” for the bunny. Desiccated coconut is finely shredded and dried coconut.
- Black licorice string: Used to create the bunny’s eyes and mouth.
Essential Equipment
Here is a list of the essential tools:
- Two 8-inch round cake pans: For baking the cake.
- Cooking spray: To grease the cake pans.
- Large bowl: For mixing the cake batter and for making the frosting.
- Mixer (hand mixer or stand mixer): For beating the cake batter and making the frosting.
- Serrated knife: For cutting the cake to create the bunny ears.
- Parchment paper: To make bunny ears.
- Square of parchment paper: to put the bunny nose.
- Toothpick: For drawing the oval shape in the frosting for the inner ears.
- Pastry brush: For brushing away excess coconut.
- Cutting board:
- Measuring cups and spoons: For accurate measurements.
- Rubber spatula or wooden spoon: For stirring and folding.
- Small bowl
List of Ingredients
Here’s a complete list of the ingredients you’ll need, with precise measurements:
- Cooking spray
- 1 (15- to 16-ounce) box chocolate cake mix (plus required ingredients listed on the box, usually eggs, oil, and water)
- 1/2 cup mini chocolate chips
- 2 sticks (1 cup) salted butter, at room temperature
- 4 cups powdered sugar
- 2 tablespoons whole milk, plus more if needed
- 1 tablespoon vanilla extract
- 1/2 cup pink and white nonpareils
- 1 1/2 cups unsweetened desiccated coconut
- 1 string black licorice, cut into four 2-inch pieces

Step-by-Step Instructions
Let’s get baking! Here’s a detailed, step-by-step guide:
Step 1: Preheat Oven and Prepare Pans
Preheat the oven to 350°F (175°C). Coat two 8-inch round cake pans with cooking spray.
Step 2: Make Cake Batter
Prepare the chocolate cake mix according to the directions on the box. This typically involves combining the cake mix with eggs, oil, and water.
Stir the mini chocolate chips into the batter.
Step 3: Bake Cake
Divide the batter evenly between the prepared cake pans.
Bake as directed on the box, or until a toothpick inserted into the center of each cake comes out clean.
Step 4: Cool Cakes
Let the cakes cool in the pans for 10 minutes. Then, remove the cakes from the pans and transfer them to a wire rack to cool completely.
Step 5: Make Frosting
While the cakes are cooling, make the frosting. Beat the softened butter in a large bowl with a mixer on high speed until fluffy, 1 to 2 minutes.
Add the powdered sugar, 2 tablespoons of milk, and the vanilla extract. Beat on low speed to combine, then increase the speed to high and beat until smooth, light, and spreadable, 2 to 3 minutes. Add 1 more tablespoon of milk if needed to achieve a spreadable consistency.
Step 6: Make Bunny Nose
Dollop a nickel-size mound of frosting on a square of parchment paper.
Smooth it out slightly.
Sprinkle with nonpareils to cover the frosting completely.
Place in the freezer to harden.
Step 7: Cut Cake into Bunny Shape
Place one of the cooled cake rounds on a cutting board.
Starting from one side of the cake, measure 2 1/2 inches toward the center. Use a serrated knife to cut through that point vertically to make a long, bunny ear-shaped slice.
Repeat on the opposite side of the cake. You’ll have a wide strip of cake left in the middle (which you can snack on or save for another use!) and two bunny ear shapes.
Step 8: Assemble Bunny on Platter
Place the second, uncut cake round near the bottom of a large platter. This will be the bunny’s head.
With the rounded sides of the ears facing out, cut a small notch (about 1 inch) from the bottom of each ear to make a flat edge.
Place the ears at the top of the head with the flat edges of the ears flush against the head and about 1 inch apart.
Step 9: Frost Cake
Generously frost the entire cake (head and ears) with the vanilla frosting.
Step 10: Decorate Ears
Use a toothpick to draw an oval in the middle of each ear, leaving a border of white frosting around the edges.
Carefully fill the ovals with pink and white nonpareils, pressing gently so they stick to the frosting.
Step 11: Add Coconut “Fur”
Cover the rest of the cake (the head and the outer edges of the ears) with the unsweetened desiccated coconut, pressing gently to adhere.
Step 12: Brush Away Excess Coconut
Use a pastry brush to brush away any excess coconut from the platter.
Step 13: Add Facial Features
Place the frozen frosting nose in the center of the head.
Arrange two strips of the black licorice in two curves as closed eyes.
Make a mouth in an anchor shape with the remaining licorice pieces.
Step 14: Serve
Serve the Bunny Cake immediately, or store it in the refrigerator until ready to serve.
Enjoy this adorable and delicious Easter treat!

Troubleshooting
Here are some potential issues and how to address them:
Problem: My cake is dry.
Solution: Be careful not to overbake the cake. The toothpick test should show a few moist crumbs, not be completely clean. Also, make sure you’re using the correct amount of oil and liquid as directed on the cake mix box.
Problem: My frosting is too thin.
Solution: Add more powdered sugar, a tablespoon at a time, until the frosting reaches a spreadable consistency.
Problem: My frosting is too thick.
Solution: Add a little more milk, a teaspoon at a time, until the frosting is smooth and spreadable.
Problem: My coconut isn’t sticking to the frosting.
Solution: Make sure your frosting is freshly applied and not too cold. Press the coconut gently onto the frosting. Problem: My frosting is grainy. Solution: Make sure, you butter is well softened.
Tips and Variations
Here are some tips and variations to customize your Bunny Cake:
Tip: For the best flavor, use high-quality ingredients, especially the butter and vanilla extract.
Tip: Make sure your butter and eggs are at room temperature for the best results.
Variation: Use a different flavor of cake mix, such as vanilla, yellow, or white cake.
Variation: Add different extracts to the frosting, such as almond extract or coconut extract.
Variation: Use different colors of nonpareils or sprinkles for the nose and ears.
Variation: Instead of licorice, use chocolate chips or other candies for the eyes and mouth.
Variation: Add a bow tie to the bunny using ribbon or a piece of fruit leather. Variation: Add some shredded carrots on the top.
Serving and Pairing Suggestions
This Bunny Cake is a perfect dessert for:
- Easter celebrations
- Springtime gatherings
- Birthday parties
- Baby showers
- Any occasion where you want a cute and delicious cake
Pairing Suggestions:
- Freshly brewed coffee or tea
- A glass of cold milk
- Vanilla ice cream
- Fresh fruit
- A glass of sparkling wine or champagne (for the adults!)
Nutritional Information
Nutritional values are estimates and may vary. Specific brands and any alterations will change the final counts.
Here’s an approximate nutritional breakdown per serving (assuming 12 servings):
- Calories: 450-550
- Fat: 25-35g
- Saturates: 15-18g
- Protein: 4-6g
- Carbohydrates: 50-60g
- Fiber: 2-4g
- Sugar: 40-45g
- Sodium: 200-300mg (depending on the cake mix and salt added)
This Bunny Cake is a rich and indulgent dessert, so it’s best enjoyed in moderation.
PrintBunny Cake
I hope this comprehensive guide has inspired you to make this adorable and delicious Bunny Cake! It’s a perfect centerpiece for any Easter or springtime celebration and a fun and creative baking project.
Ingredients
Here’s a complete list of the ingredients you’ll need, with precise measurements:
- Cooking spray
- 1 (15- to 16-ounce) box chocolate cake mix (plus required ingredients listed on the box, usually eggs, oil, and water)
- 1/2 cup mini chocolate chips
- 2 sticks (1 cup) salted butter, at room temperature
- 4 cups powdered sugar
- 2 tablespoons whole milk, plus more if needed
- 1 tablespoon vanilla extract
- 1/2 cup pink and white nonpareils
- 1 1/2 cups unsweetened desiccated coconut
- 1 string black licorice, cut into four 2-inch pieces
Instructions
Let’s get baking! Here’s a detailed, step-by-step guide:
Step 1: Preheat Oven and Prepare Pans
Preheat the oven to 350°F (175°C). Coat two 8-inch round cake pans with cooking spray.
Step 2: Make Cake Batter
Prepare the chocolate cake mix according to the directions on the box. This typically involves combining the cake mix with eggs, oil, and water.
Stir the mini chocolate chips into the batter.
Step 3: Bake Cake
Divide the batter evenly between the prepared cake pans.
Bake as directed on the box, or until a toothpick inserted into the center of each cake comes out clean.
Step 4: Cool Cakes
Let the cakes cool in the pans for 10 minutes. Then, remove the cakes from the pans and transfer them to a wire rack to cool completely.
Step 5: Make Frosting
While the cakes are cooling, make the frosting. Beat the softened butter in a large bowl with a mixer on high speed until fluffy, 1 to 2 minutes.
Add the powdered sugar, 2 tablespoons of milk, and the vanilla extract. Beat on low speed to combine, then increase the speed to high and beat until smooth, light, and spreadable, 2 to 3 minutes. Add 1 more tablespoon of milk if needed to achieve a spreadable consistency.
Step 6: Make Bunny Nose
Dollop a nickel-size mound of frosting on a square of parchment paper.
Smooth it out slightly.
Sprinkle with nonpareils to cover the frosting completely.
Place in the freezer to harden.
Step 7: Cut Cake into Bunny Shape
Place one of the cooled cake rounds on a cutting board.
Starting from one side of the cake, measure 2 1/2 inches toward the center. Use a serrated knife to cut through that point vertically to make a long, bunny ear-shaped slice.
Repeat on the opposite side of the cake. You’ll have a wide strip of cake left in the middle (which you can snack on or save for another use!) and two bunny ear shapes.
Step 8: Assemble Bunny on Platter
Place the second, uncut cake round near the bottom of a large platter. This will be the bunny’s head.
With the rounded sides of the ears facing out, cut a small notch (about 1 inch) from the bottom of each ear to make a flat edge.
Place the ears at the top of the head with the flat edges of the ears flush against the head and about 1 inch apart.
Step 9: Frost Cake
Generously frost the entire cake (head and ears) with the vanilla frosting.
Step 10: Decorate Ears
Use a toothpick to draw an oval in the middle of each ear, leaving a border of white frosting around the edges.
Carefully fill the ovals with pink and white nonpareils, pressing gently so they stick to the frosting.
Step 11: Add Coconut “Fur”
Cover the rest of the cake (the head and the outer edges of the ears) with the unsweetened desiccated coconut, pressing gently to adhere.
Step 12: Brush Away Excess Coconut
Use a pastry brush to brush away any excess coconut from the platter.
Step 13: Add Facial Features
Place the frozen frosting nose in the center of the head.
Arrange two strips of the black licorice in two curves as closed eyes.
Make a mouth in an anchor shape with the remaining licorice pieces.
Step 14: Serve
Serve the Bunny Cake immediately, or store it in the refrigerator until ready to serve.
Enjoy this adorable and delicious Easter treat!
Recipe Summary and Q&A
Let’s recap the recipe and address some frequently asked questions:
Recipe Summary: We made a Bunny Cake by baking two round chocolate cakes from a mix, adding mini chocolate chips, making a homemade vanilla frosting, cutting one cake to create bunny ears, assembling the cake on a platter, frosting it, decorating it with nonpareils for the inner ears and nose, coconut for the fur, and licorice for the eyes and mouth.
Q&A:
Q: Can I make this cake ahead of time?
A: Yes, you can bake the cakes a day or two in advance and store them, well-wrapped, at room temperature. You can also make the frosting ahead of time and store it in the refrigerator. Bring it to room temperature and re-whip it before using. Assemble and decorate the cake closer to serving time.
Q: Can I use a different type of frosting?
A: Yes, you can use any type of frosting you prefer, such as chocolate frosting, cream cheese frosting, or even a whipped cream frosting.
Q: Can I freeze this cake?
A: It’s best to freeze the unfrosted cake layers. Wrap them individually in plastic wrap and then in foil, or place them in a freezer-safe bag or container. Freeze for up to 2 months. Thaw in the refrigerator overnight before frosting and assembling.
Q: I don’t have desiccated coconut. What can I use instead?
A: You can use shredded coconut, but the texture will be slightly different. You can also omit the coconut altogether, or use a different topping, such as sprinkles or chopped nuts.
Q: How can I make this cake vegan?
A: Use a vegan chocolate cake mix, vegan butter, and a plant-based milk substitute in the frosting. Make sure your nonpareils and licorice are also vegan. Q: How can I store the leftovers?
A: You can keep them in the fridge.

