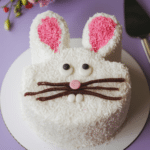
Bunny Cake
I hope this comprehensive guide has inspired you to make this adorable and delicious Bunny Cake! It’s a perfect centerpiece for any Easter or springtime celebration and a fun and creative baking project.
Ingredients
Here’s a complete list of the ingredients you’ll need, with precise measurements:
- Cooking spray
- 1 (15- to 16-ounce) box chocolate cake mix (plus required ingredients listed on the box, usually eggs, oil, and water)
- 1/2 cup mini chocolate chips
- 2 sticks (1 cup) salted butter, at room temperature
- 4 cups powdered sugar
- 2 tablespoons whole milk, plus more if needed
- 1 tablespoon vanilla extract
- 1/2 cup pink and white nonpareils
- 1 1/2 cups unsweetened desiccated coconut
- 1 string black licorice, cut into four 2-inch pieces
Instructions
Let’s get baking! Here’s a detailed, step-by-step guide:
Step 1: Preheat Oven and Prepare Pans
Preheat the oven to 350°F (175°C). Coat two 8-inch round cake pans with cooking spray.
Step 2: Make Cake Batter
Prepare the chocolate cake mix according to the directions on the box. This typically involves combining the cake mix with eggs, oil, and water.
Stir the mini chocolate chips into the batter.
Step 3: Bake Cake
Divide the batter evenly between the prepared cake pans.
Bake as directed on the box, or until a toothpick inserted into the center of each cake comes out clean.
Step 4: Cool Cakes
Let the cakes cool in the pans for 10 minutes. Then, remove the cakes from the pans and transfer them to a wire rack to cool completely.
Step 5: Make Frosting
While the cakes are cooling, make the frosting. Beat the softened butter in a large bowl with a mixer on high speed until fluffy, 1 to 2 minutes.
Add the powdered sugar, 2 tablespoons of milk, and the vanilla extract. Beat on low speed to combine, then increase the speed to high and beat until smooth, light, and spreadable, 2 to 3 minutes. Add 1 more tablespoon of milk if needed to achieve a spreadable consistency.
Step 6: Make Bunny Nose
Dollop a nickel-size mound of frosting on a square of parchment paper.
Smooth it out slightly.
Sprinkle with nonpareils to cover the frosting completely.
Place in the freezer to harden.
Step 7: Cut Cake into Bunny Shape
Place one of the cooled cake rounds on a cutting board.
Starting from one side of the cake, measure 2 1/2 inches toward the center. Use a serrated knife to cut through that point vertically to make a long, bunny ear-shaped slice.
Repeat on the opposite side of the cake. You’ll have a wide strip of cake left in the middle (which you can snack on or save for another use!) and two bunny ear shapes.
Step 8: Assemble Bunny on Platter
Place the second, uncut cake round near the bottom of a large platter. This will be the bunny’s head.
With the rounded sides of the ears facing out, cut a small notch (about 1 inch) from the bottom of each ear to make a flat edge.
Place the ears at the top of the head with the flat edges of the ears flush against the head and about 1 inch apart.
Step 9: Frost Cake
Generously frost the entire cake (head and ears) with the vanilla frosting.
Step 10: Decorate Ears
Use a toothpick to draw an oval in the middle of each ear, leaving a border of white frosting around the edges.
Carefully fill the ovals with pink and white nonpareils, pressing gently so they stick to the frosting.
Step 11: Add Coconut “Fur”
Cover the rest of the cake (the head and the outer edges of the ears) with the unsweetened desiccated coconut, pressing gently to adhere.
Step 12: Brush Away Excess Coconut
Use a pastry brush to brush away any excess coconut from the platter.
Step 13: Add Facial Features
Place the frozen frosting nose in the center of the head.
Arrange two strips of the black licorice in two curves as closed eyes.
Make a mouth in an anchor shape with the remaining licorice pieces.
Step 14: Serve
Serve the Bunny Cake immediately, or store it in the refrigerator until ready to serve.
Enjoy this adorable and delicious Easter treat!
Find it online: https://www.eatswithsoul.com/bunny-cake/
